HubSpot Integration
The thanks.io integration for HubSpot lets you send postcards, letters, notecards, and gift cards directly from any contact or company record in your HubSpot CRM, add a contact or company to a thanks.io mailing list from the record's sidebar or from a HubSpot workflow, and mail a piece automatically from a HubSpot workflow.
The app adds two cards to HubSpot records and seven actions to HubSpot's workflow builder:
- thanks.io Step-by-Step send wizard - a tab in the middle column for sending a single mailer to the record. See Send direct mail from a contact.
- thanks.io Mailing Lists - a card in the right sidebar for adding the record to a mailing list, seeing which lists it is on, and removing it. See Add a contact or company to a mailing list.
- Send workflow actions - Send 4x6 Postcard, Send 6x9 Postcard, Send 6x11 Postcard, Send Letter, Send Windowless Letter, and Send Notecard, available as steps in any contact or company workflow. Each enrolled record gets a real mailed piece when it reaches the step. See Send mail from a HubSpot workflow.
- Add to Mailing List workflow action - a step that adds each enrolled contact or company to a thanks.io mailing list instead of mailing it. It places no order; its one charge is the email address lookup for a record missing its address, which is on by default and can be turned off. See Add records to a mailing list from a HubSpot workflow.
Getting started
Click here to install the thanks.io app for HubSpot.
Once installed, follow the steps below to add the send wizard and the mailing list card to your contact view. The workflow actions need no record-view setup; they appear in the workflow builder as soon as the app is connected.
Add thanks.io to your HubSpot Contact view
These steps only need to be completed once by an account admin.
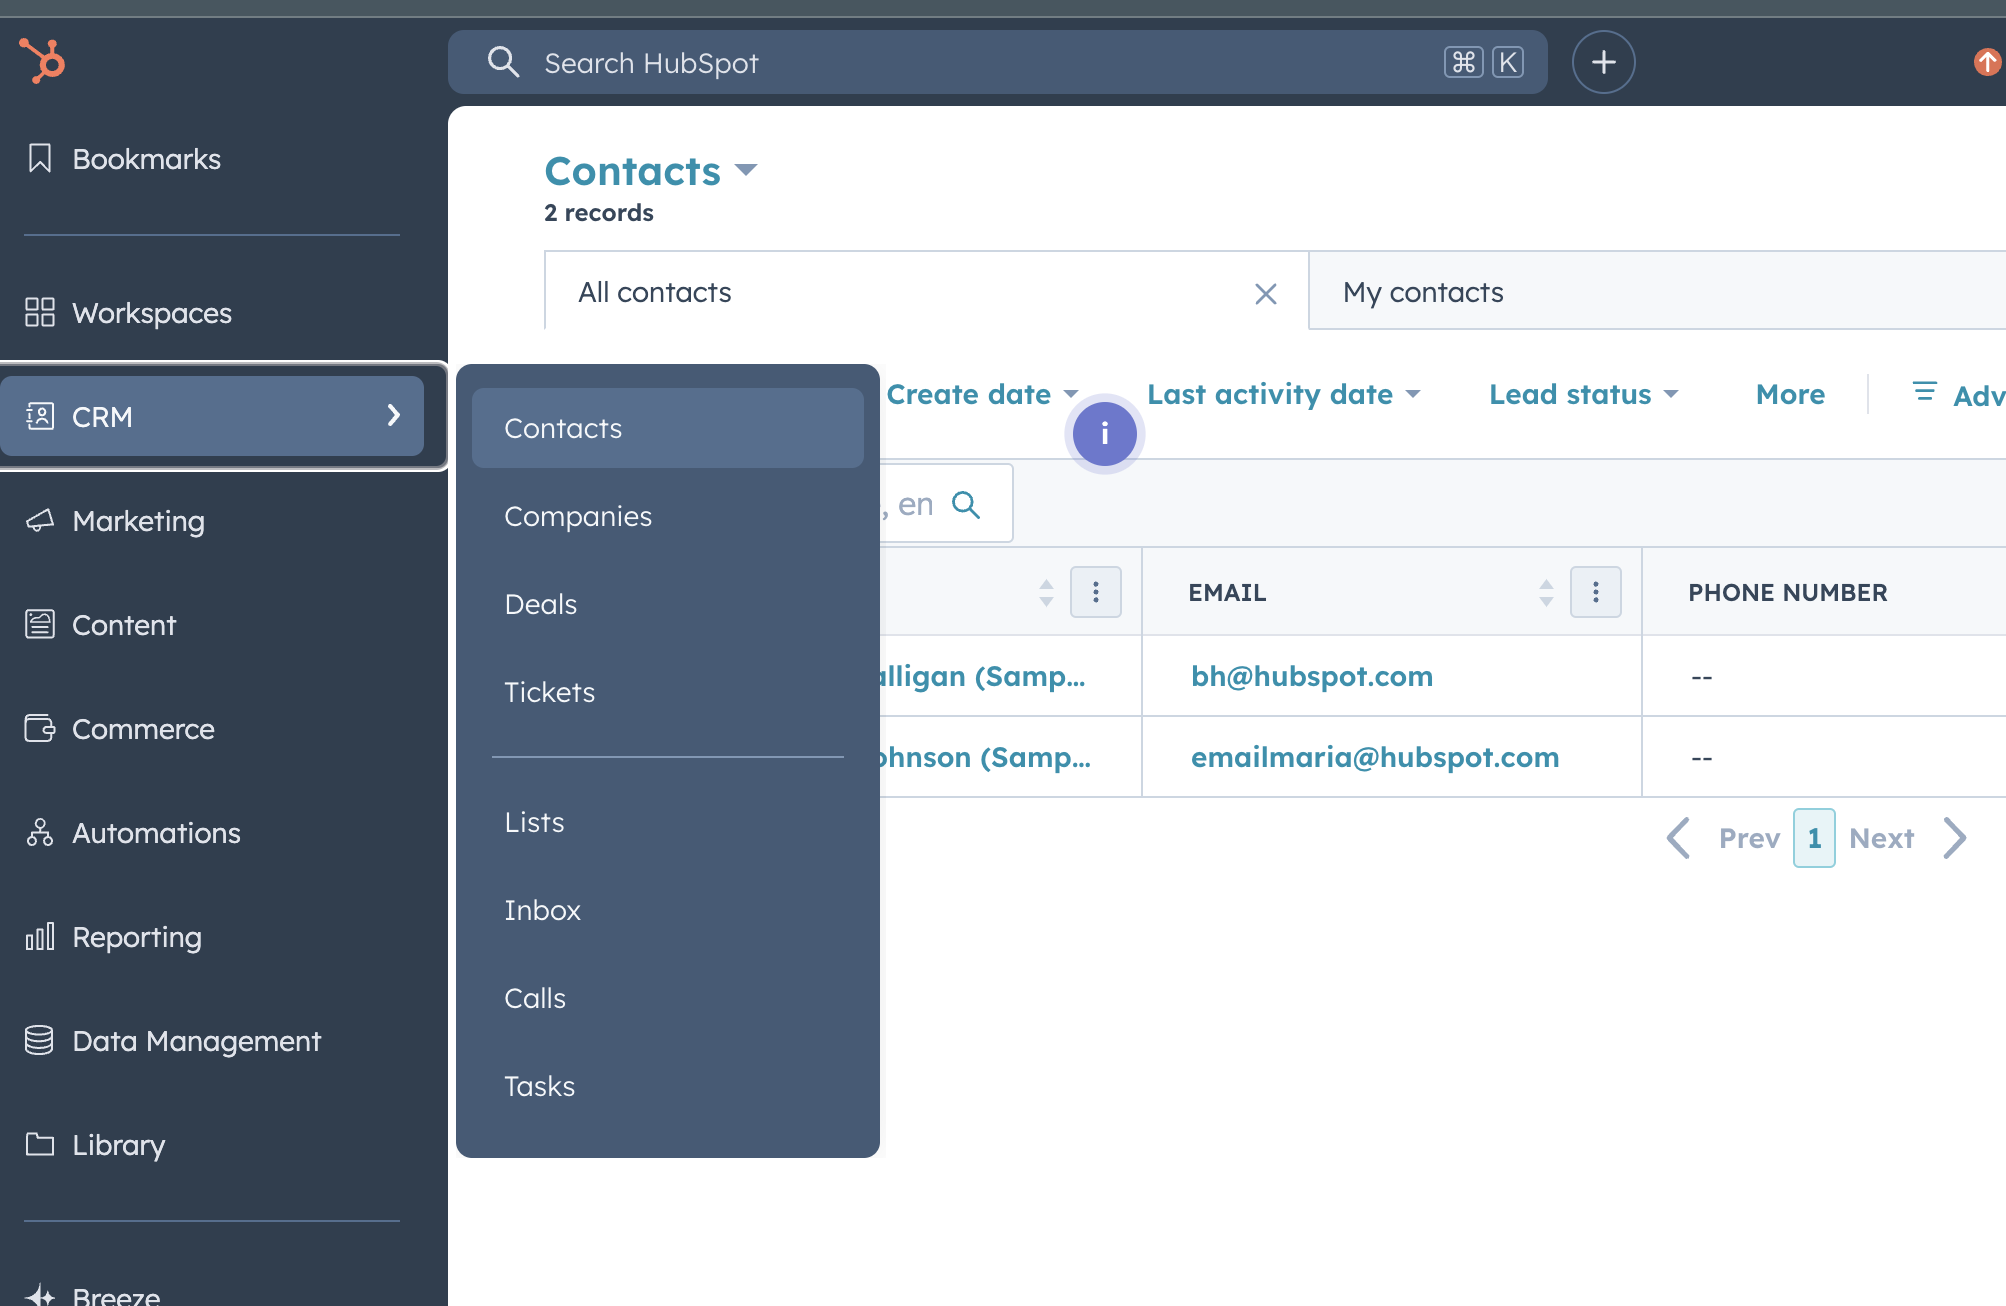
- Navigate to one of your contacts in HubSpot (CRM > Contacts).
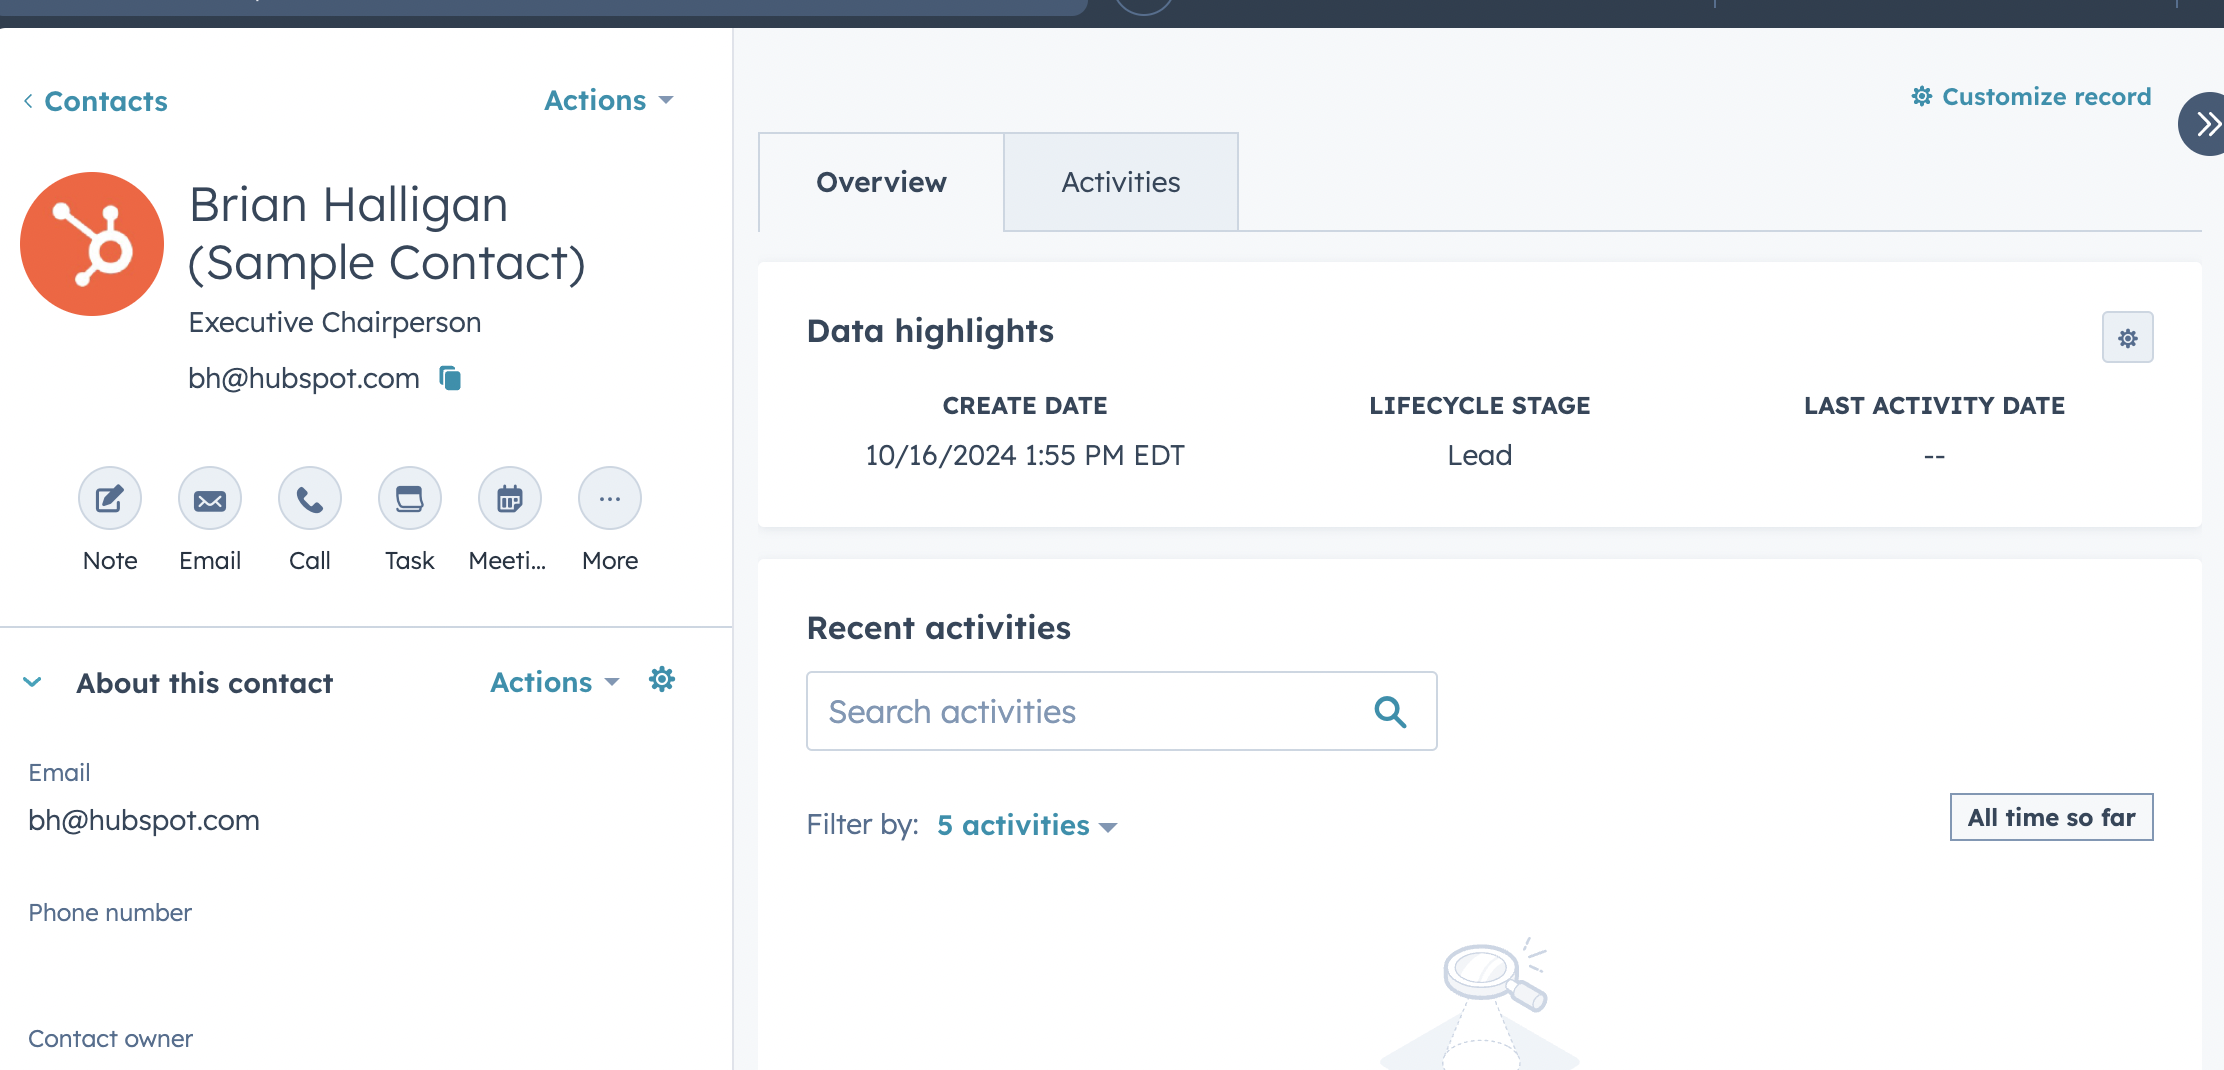
- On the contact's middle tab, click Customize record.
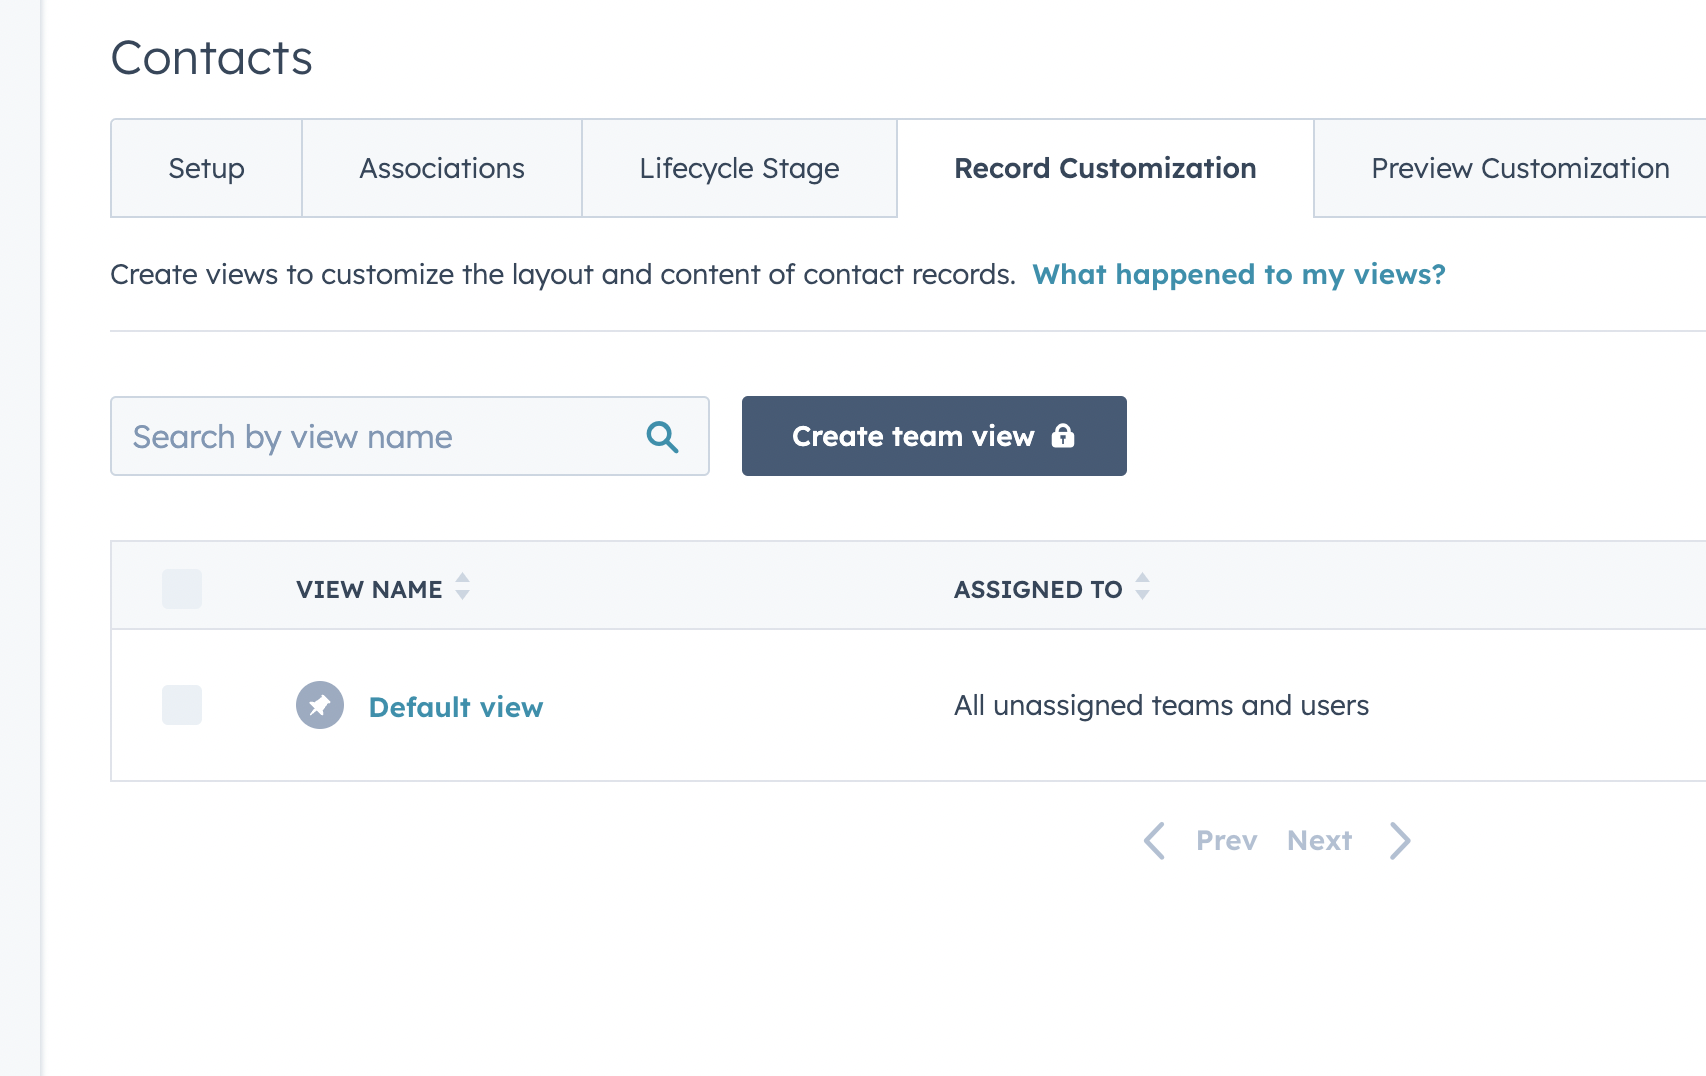
- Click the view you want to edit - in most cases, this is the Default View.
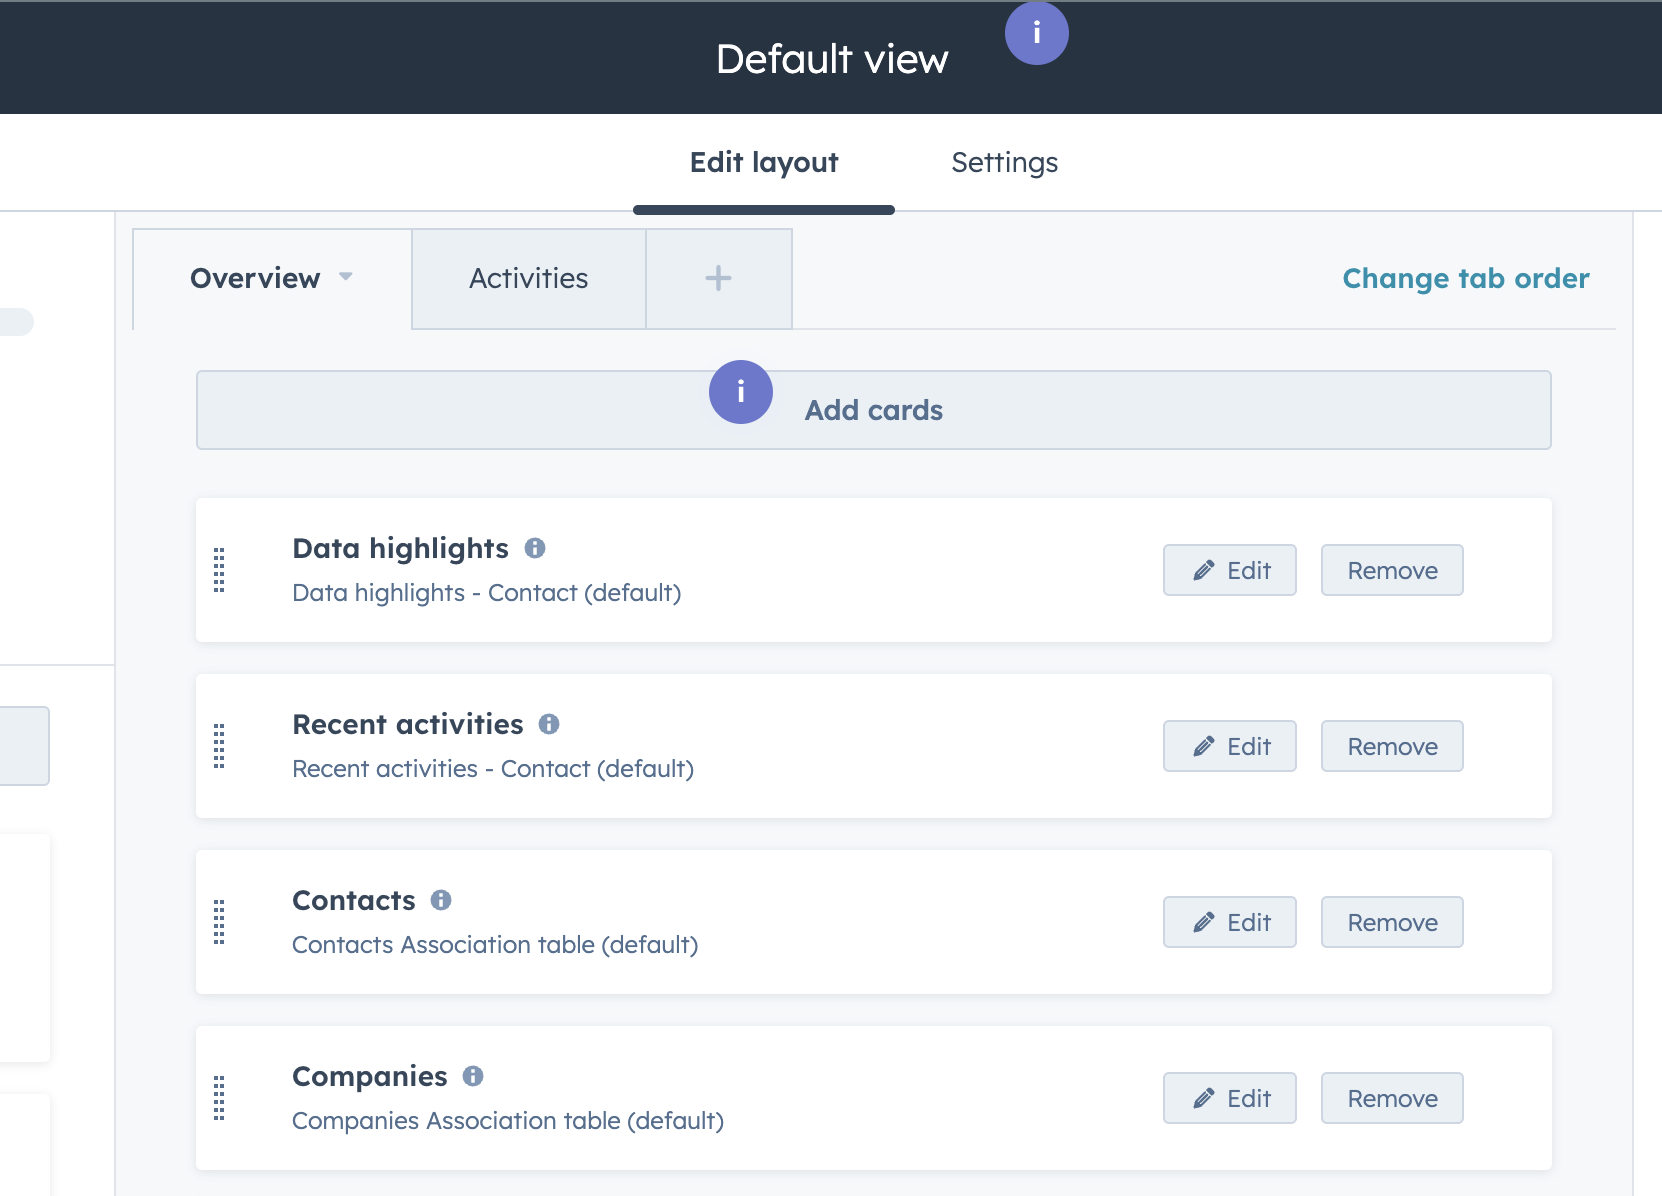
- Click Add Cards on the middle column.
- Under the Apps section, select thanks.io Step-by-Step send wizard.
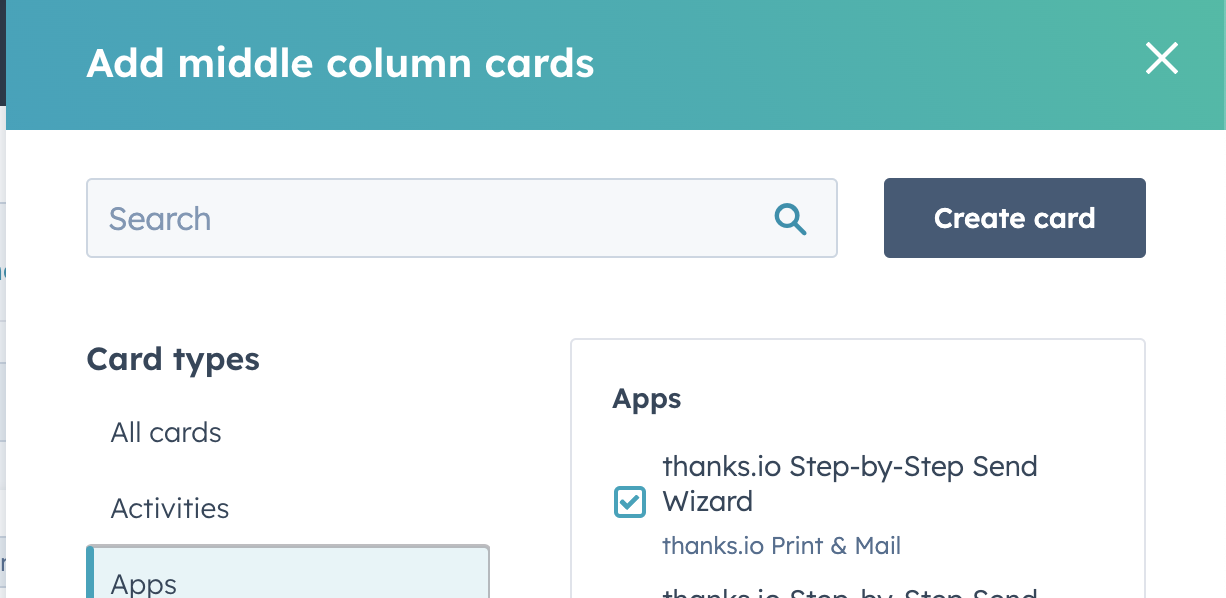
- Click X to close the right panel. You can reorder the cards if needed. Click Save in the upper right.
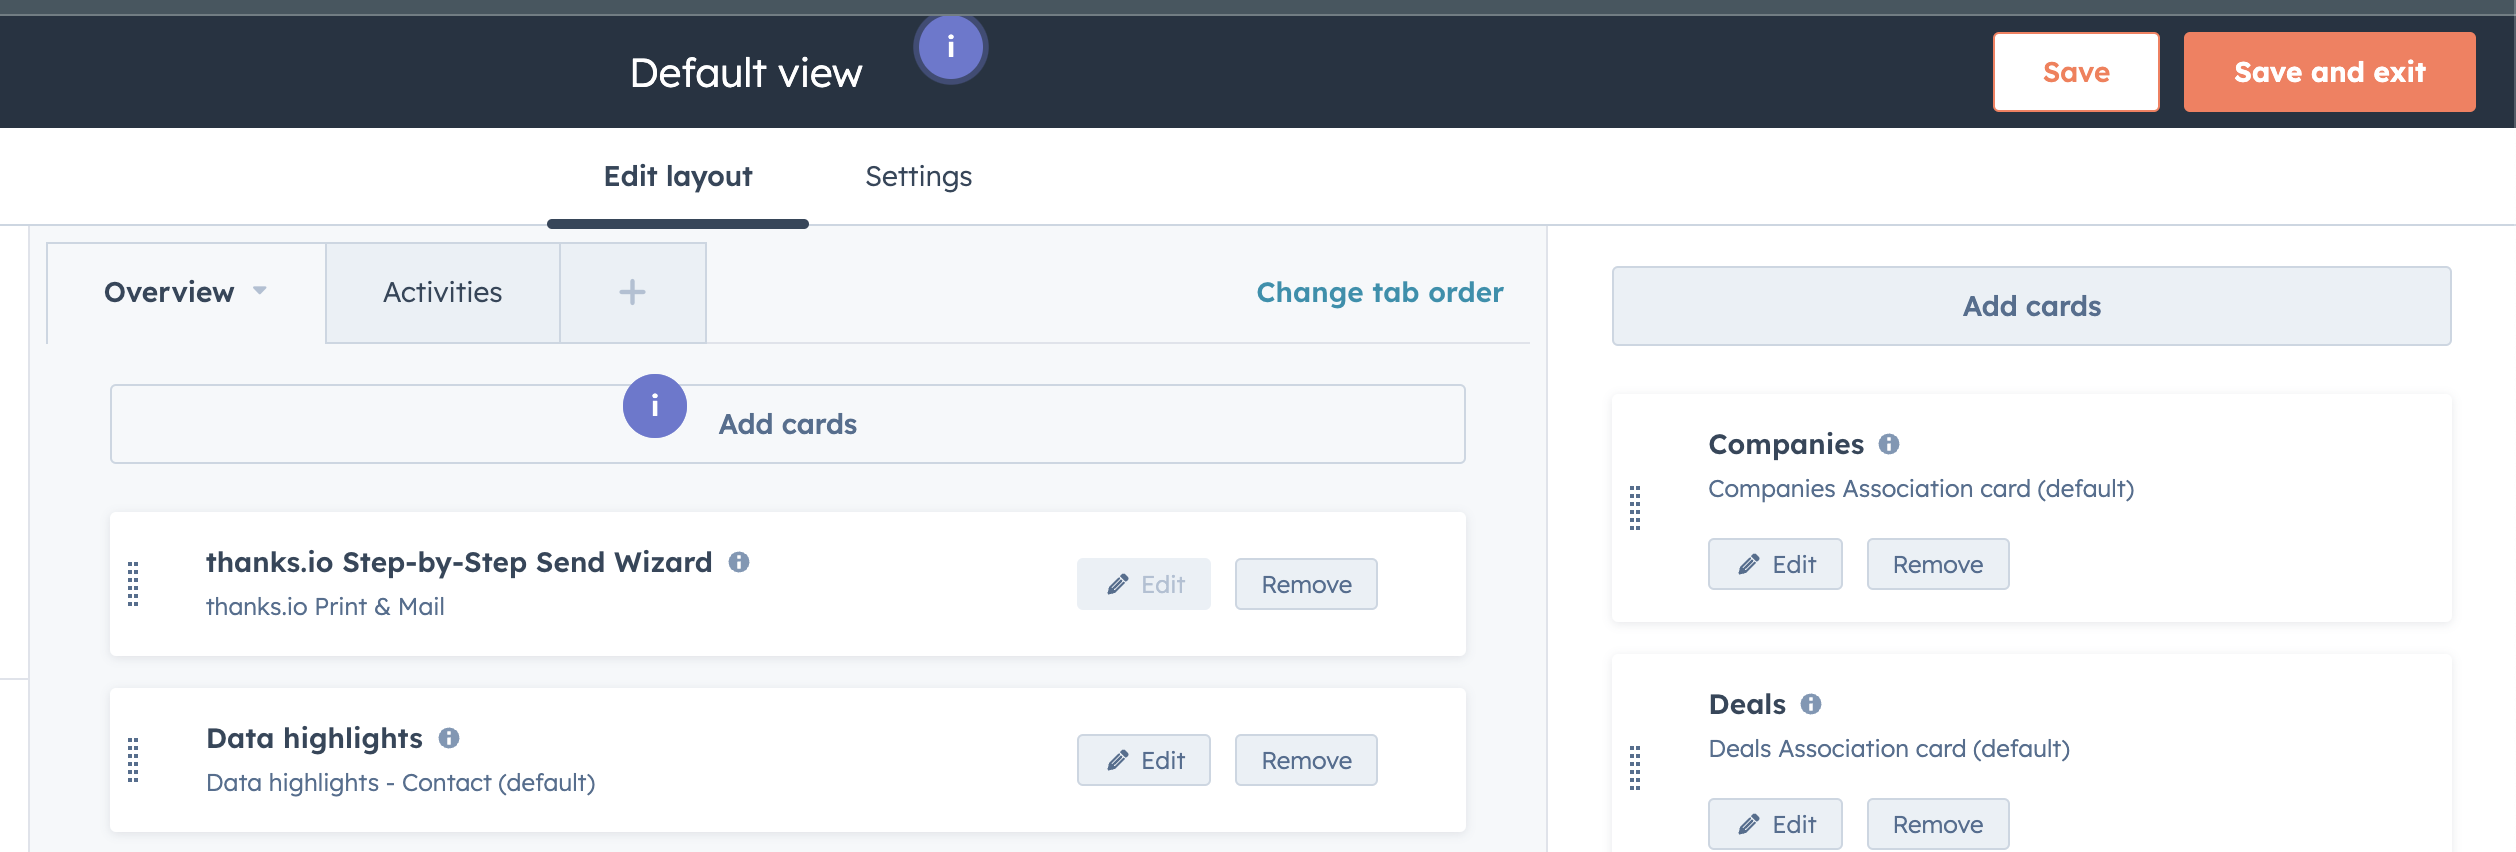
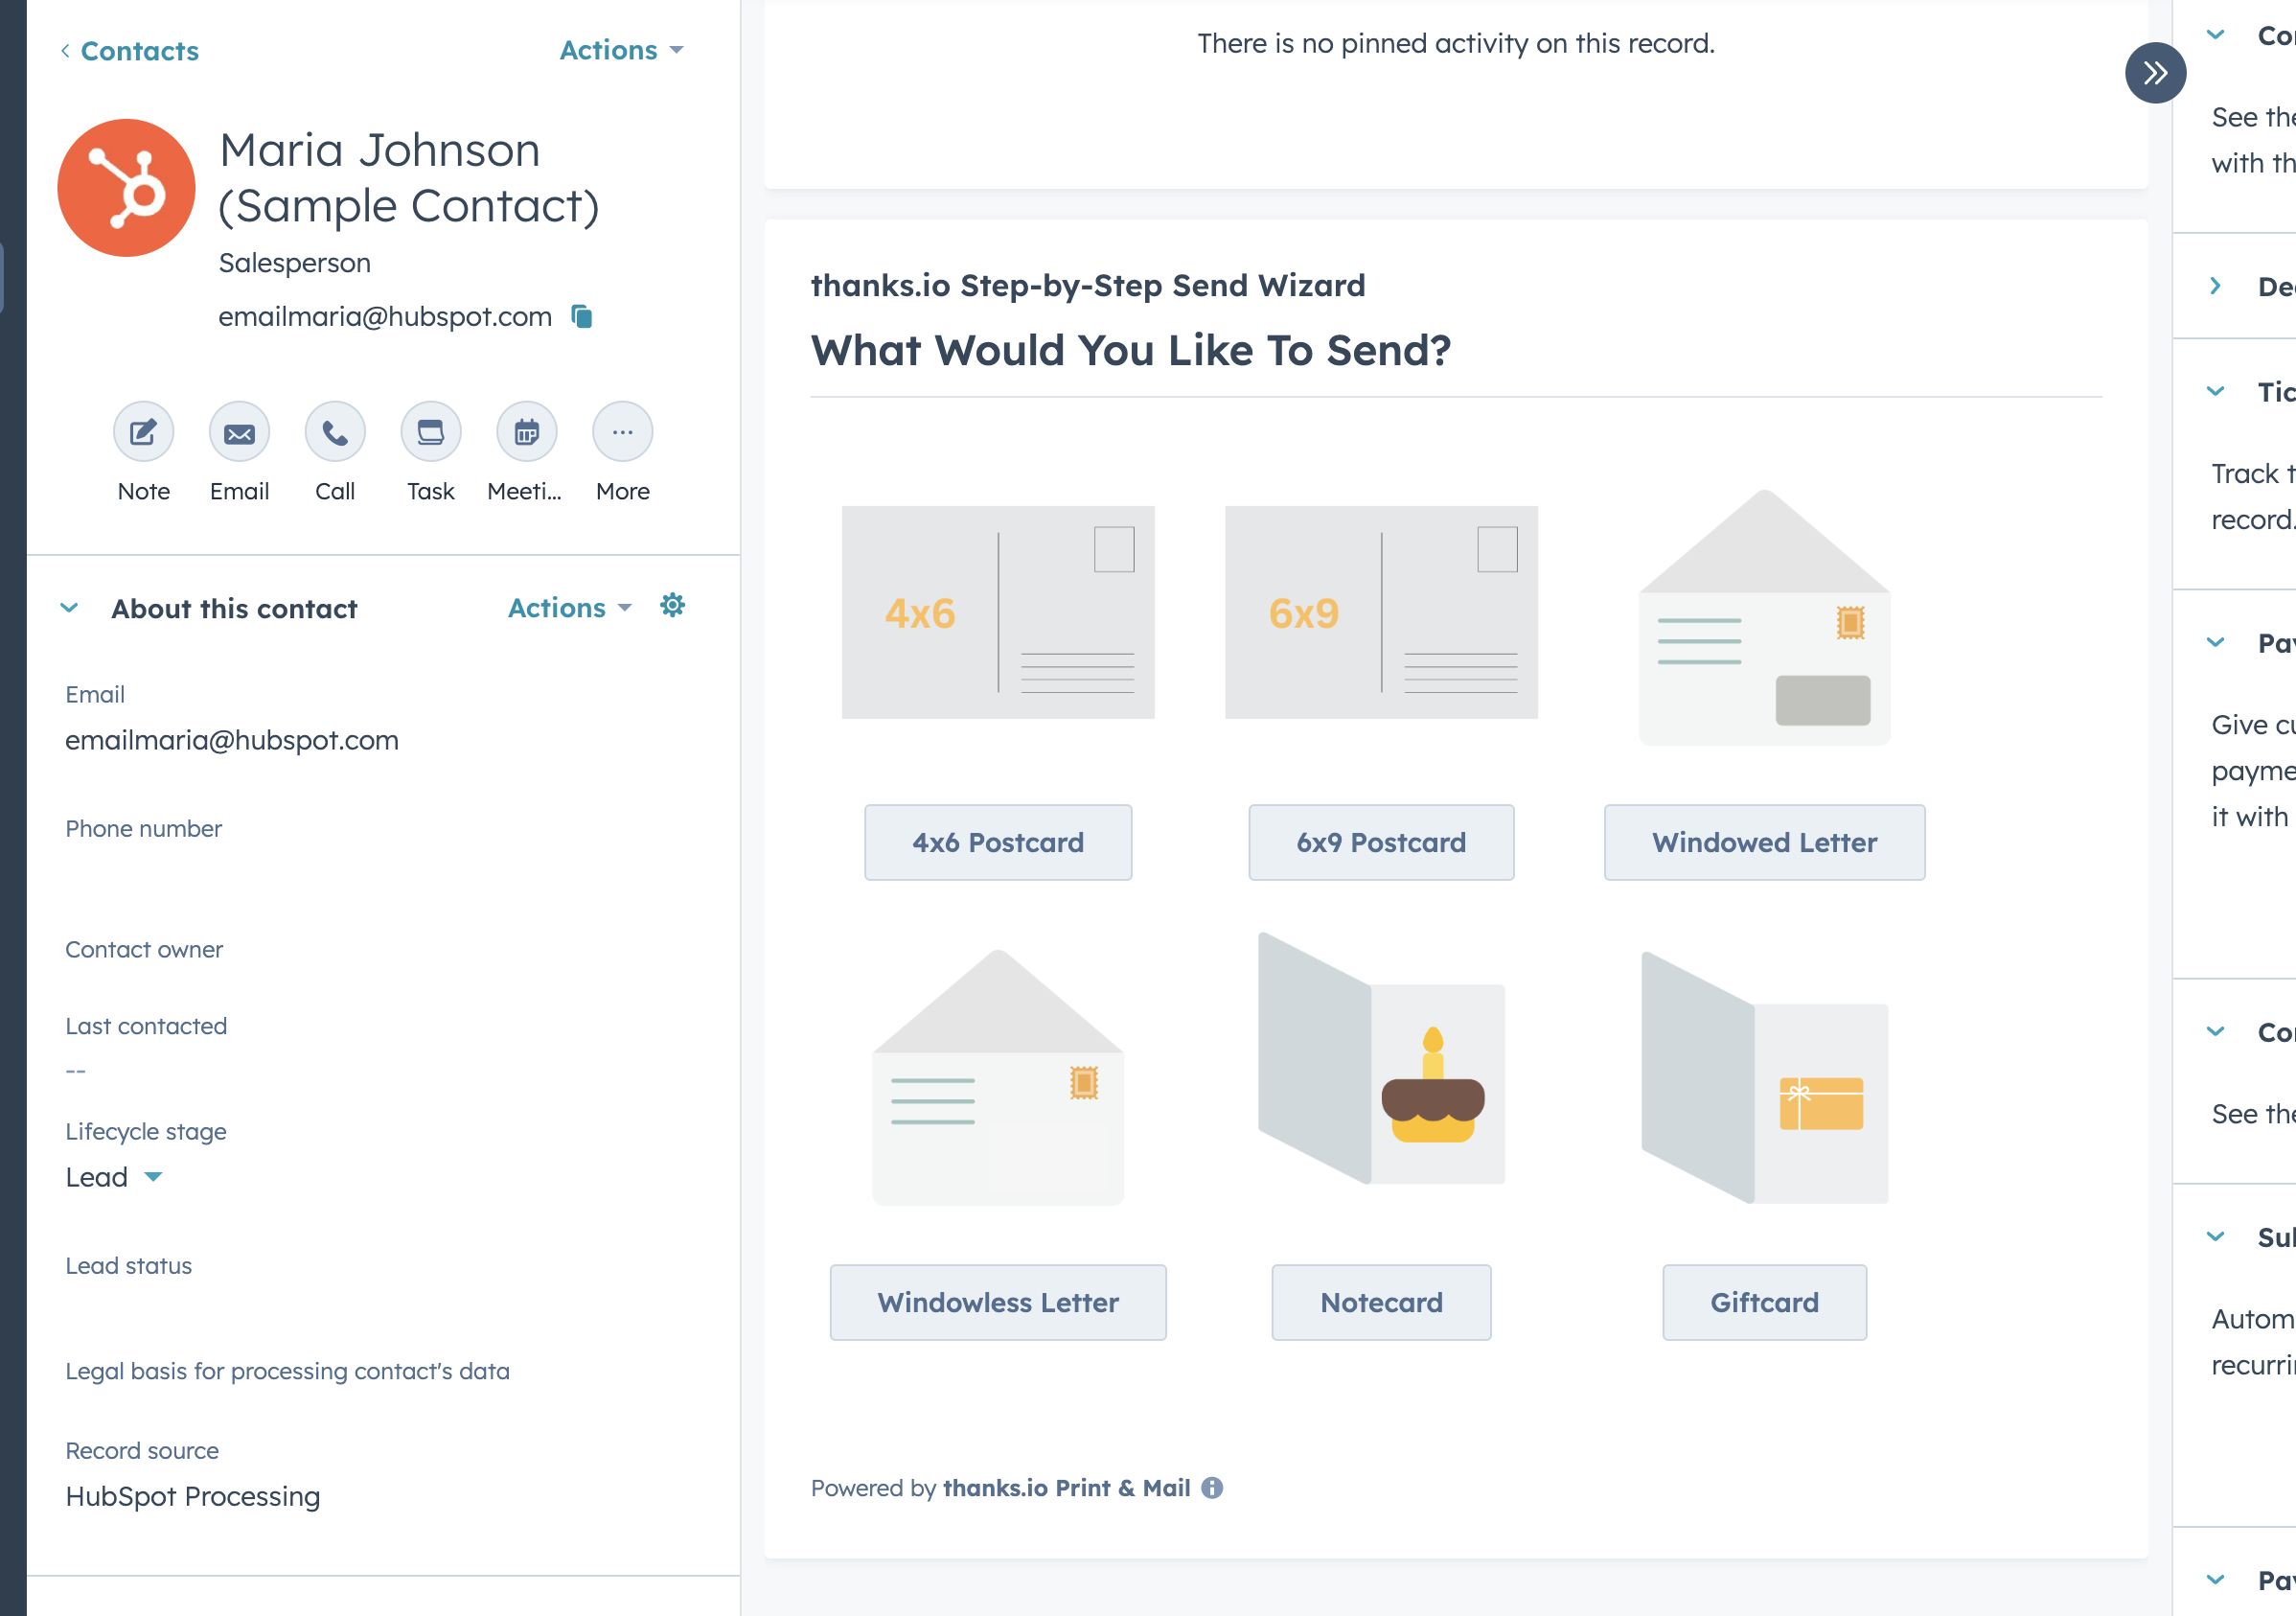
- The thanks.io Step-by-Step send wizard appears in the middle column Overview section of the contact page.
Add the mailing list card to the sidebar
The thanks.io Mailing Lists card lives in the right sidebar of the record rather than the middle column. While editing the same view:
- Click Add Cards on the right sidebar.
- Under the Apps section, select thanks.io Mailing Lists.
- Close the panel and click Save.
Repeat the same steps on a company record view if you want the cards on companies as well - both cards work on Contact and Company records.
Send direct mail from a contact
- Open a contact or company record in HubSpot.
- On the contact's column tab, click Overview.
- Scroll down to the thanks.io Step-by-Step send wizard. If you don't see it, an admin will need to complete the setup steps above.
-
Select the Mail Type you want to send.
-
Select the Image Template - this is the front of the mailer for postcards, notecards, and gift cards, or the background image for cover letters. If you have no image templates, you can add them at dashboard.thanks.io/image_templates.
-
Add a message for the mailer. For postcards, this is the back of the postcard. For notecards and gift cards, this is the inside of the mailer. For letters, this is the cover letter. You can select a message template or enter a custom message. Note: gift cards require a message template. New message templates can be added at dashboard.thanks.io/message_templates.
-
Review the creative preview for your mailer. If everything looks correct, click Send.
Add a contact or company to a mailing list
The thanks.io Mailing Lists card in the right sidebar of a contact or company record adds that record to one of your thanks.io mailing lists using the mailing address stored on the HubSpot record. The record's name, company, mailing address, and email are copied to the recipient row on the list.
If you don't see the card, an admin needs to add it to the record sidebar (see Add the mailing list card to the sidebar).
Which lists appear
The Mailing list dropdown offers every list on your thanks.io account except suppression lists and the lists thanks.io fills on its own (the QR scan list and the Neighbor Blast list). The Add to Mailing List workflow action offers the same set of lists.
Add the record to a list
-
Open a contact or company record in HubSpot and find the thanks.io Mailing Lists card in the right sidebar. The top of the card shows the lists the record is already on, or Not on any thanks.io mailing list yet.
-
Choose a list from the Mailing list dropdown.
-
Click Add to list.
The record needs a street address and a ZIP code for the button to be enabled. If either is missing, the card says so; add them to the HubSpot record, or, for a contact with an email address, use the address lookup below.
After the add, the card reports one of:
- Added - the record was added to the list and its address was sent for verification, like any other recipient.
- Already on the list - the record (or someone with the same name and address) was already on that list. Nothing was duplicated; the existing recipient's details were refreshed from the HubSpot record instead.
Create a list from the card
- In the Mailing list dropdown, choose + Create a new list....
- Enter a New list name and click Create list.
- The new list is selected automatically. Click Add to list to put the record on it.
The list is created on your thanks.io account like any list made from the dashboard, so you can attach a campaign to it, upload more recipients, or export it as usual. It is also immediately selectable in the Mailing list dropdown of an Add to Mailing List workflow step.
Remove the record from a list
The lists the record is on appear as tags at the top of the card. Click the x on a tag to remove the record from that list. This deletes the recipient row from the list; it does not change anything on the HubSpot record.
Look up a mailing address from an email
A contact that has an email address but no street address and ZIP can still be added: click Look up address by email ($). thanks.io runs an Address Append on the email, and if it finds a mailing address, adds the contact to the selected list with that address.
Things to know before you click it:
- It is a paid data service. The lookup is billed to your thanks.io balance only when a match is found. If no address is found, the card says No address found and nothing is charged. Current rates are at thanks.io/pricing.
- It never runs on its own. The plain Add to list button does not fall back to a lookup, so you are never charged unless you click the lookup button.
- Your balance must not be negative. If it is, the card reports Not enough credits and the lookup does not run. Add credits on the dashboard and try again.
- Contacts only. Company records have no email to look up from, so the button does not appear on them.
- Names must be printable. The contact's name and company are checked before the lookup runs; emoji and non-Latin characters are rejected up front so a lookup is never charged for a recipient that can't be printed.
- If the contact is already on the selected list, the card reports Already on the list and no lookup is charged.
Adding the same record again
Adding a record to a list it is already on updates the existing recipient rather than creating a second row. Change the address on the HubSpot record, click Add to list again, and the recipient's address is updated and re-verified. Duplicate suppression on sends still works the same way it does for any recipient - see Duplicate Prevention.
The card and the Add to Mailing List workflow action share this link. A record added to a list from the card and then enrolled in a workflow that adds it to the same list is one recipient, not two, and the card shows it as a member either way.
The link between a HubSpot record and its recipient row belongs to one list. If you move that recipient to a different list from the thanks.io dashboard, the card stops showing the record as a member of either list, and the next Add to list creates a fresh recipient.
Automate mail from a HubSpot record
Pair the card with a campaign on the list to turn "add to list" into "mail goes out":
- In the thanks.io dashboard, create a Days After Added campaign on the list, with the delay you want between the add and the mailer.
- In HubSpot, add the record to that list from the card.
- thanks.io verifies the address and mails the piece on the campaign's schedule. Every record you add from then on gets the same treatment.
To keep the list-based flow but fill the list from a HubSpot workflow instead of by hand, use the Add to Mailing List workflow action. To mail without a list at all, add one of the thanks.io send actions to a workflow; the piece goes out when the record reaches the step.
Send mail from a HubSpot workflow
Six of the thanks.io workflow actions send mail. Put one in a contact or company workflow and every record that reaches the step is mailed a real piece, addressed from the record's own properties unless you map something else. The send is validated and billed exactly like a send from the dashboard or the API: the same balance, the same image and message template rules, and the same address verification.
| Action | Front design comes from | Message goes |
|---|---|---|
| Send 4x6 Postcard | Your postcard image templates | On the back of the card |
| Send 6x9 Postcard | Your postcard image templates (shared with 4x6) | On the back of the card |
| Send 6x11 Postcard | Your 6x11 image templates | On the back of the card |
| Send Letter | Your letter image templates (the letterhead) | On the cover page, mailed in a windowed envelope |
| Send Windowless Letter | Your windowless letter image templates (the letterhead) | On the cover page, mailed in a plain envelope with a handwritten-style address |
| Send Notecard | Your notecard image templates (the cover) | Inside the folded card |
Gift cards and MagnaCards are not available as workflow actions. Send those from the record tab or the dashboard.
The seventh action, Add to Mailing List, mails nothing; it is covered in Add records to a mailing list from a HubSpot workflow.
Add a thanks.io action to a workflow
- In HubSpot, go to Automation > Workflows and open a contact-based or company-based workflow, or create one.
- Click + where you want the mail to go out and find the thanks.io app in the action panel.
- Pick the action for the piece you want to send, for example Send 4x6 Postcard.
- Choose a Front image template (required). The dropdown lists only your image templates of the matching type, so a 6x11 design is never offered to a 4x6 step.
- Choose a Message template, or type a Custom message instead. Set a Handwriting style and a QR code URL if you want them.
- Leave the recipient fields blank to mail the enrolled record at its own address, or map them to other properties (see Recipient fields).
- Save the action and turn the workflow on.
If the thanks.io actions do not appear in the action panel, reconnect the app: open the install link under Getting started and authorize it again. The workflow actions need a HubSpot permission (automation) that the app requests on install, and an older connection may not have granted it.
Step fields
| Field | What it does |
|---|---|
| Front image template (Letterhead image template on letters, Cover image template on notecards) | Required. The design printed on the piece, from your thanks.io image templates of the matching type. 4x6 and 6x9 postcards share the postcard templates; 6x11 postcards have their own set. |
| Message template | The handwritten text, from your saved message templates of the matching type. The dropdown shows the start of each template's text so you can tell them apart. Used when Custom message is blank. |
| Custom message (instead of a template) | Type the handwritten text here to send it instead of the template above. Leave it blank to use the template. Replacement variables such as %FIRST_NAME% work in either. |
| Handwriting style | The font the message is written in. Your thanks.io account default is used when blank. |
| QR code URL | Optional. Adds a tracked QR code to the piece, so scans show up in your thanks.io analytics. Sends without one produce no scan data. |
The mail settings are fixed values for the step; every record that reaches it gets the same design, message, and QR code URL. Personalize the text with replacement variables rather than by mapping properties.
Recipient fields
Each recipient field maps to a HubSpot property. Leave a field blank and thanks.io fills it from the enrolled record's own property, so for most workflows you can leave them all blank.
| Field | When blank, taken from |
|---|---|
| Recipient name | The enrolled contact's first and last name, or the company's name. Map this for a company, or for a single property that holds the whole name. For a contact, map Recipient first name and Recipient last name instead. |
| Recipient first name | The enrolled contact's first name. Used with Recipient last name when Recipient name is blank. |
| Recipient last name | The enrolled contact's last name. Used with Recipient first name when Recipient name is blank. |
| Company | The enrolled record's company (for a company record, its name). |
| Address line 1 | The enrolled record's street address. Not needed when an email is available for address lookup. |
| Address line 2 | Nothing. Map it for an apartment, suite, or unit property. |
| City | The enrolled record's city. |
| State / province | The enrolled record's state or region. |
| Postal code | The enrolled record's postal code. |
| Country | The enrolled record's country. |
| The enrolled contact's email. Lets thanks.io look up a missing mailing address. |
A few things about how the name is put together:
- A mapped Recipient name wins outright.
- Otherwise the name is first name plus last name. Map only one half, say a preferred-first-name property, and the other half still comes from the record, so the piece is addressed to "Jane Doe" rather than just "Jane".
- Names must be printable. A name with emoji or non-Latin characters fails the send, the same as it does from the dashboard.
Address lookup from an email
A record with an email but no street address still mails. thanks.io runs an Address Append on the email and, if it finds a mailing address, sends the piece there. This is the same lookup the API runs on sends with email lookup on, and it is billed the same way: charged to your thanks.io balance only when a match is found, at the rate on thanks.io/pricing. If no address is found, the send fails and nothing is charged for the lookup.
What happens when the step runs
- The order is placed on the thanks.io account connected to your HubSpot portal and appears under Orders in the dashboard like any other send.
- A note is written on the HubSpot record for the send, the same as a send from the record tab.
- A send that cannot be placed, for example a missing address that could not be looked up, an insufficient balance, or a name that cannot be printed, fails that record's enrollment in HubSpot. HubSpot does not retry it; fix the record or the account and re-enroll it.
- If HubSpot delivers the same execution twice, thanks.io returns the order it already placed rather than mailing the piece again.
Output fields
Each action makes three values available to later steps in the workflow, for example to write the order ID to a property or branch on the status:
| Output | Value |
|---|---|
| thanks.io order ID | The order's ID on thanks.io. |
| thanks.io order status | The order's status at the time the step ran, usually queued. |
| thanks.io order URL | A link to the order in the thanks.io dashboard. |
Test a send action with a single record before enrolling a list. Every execution mails a real piece and charges your balance; there is no preview step in a workflow.
Add records to a mailing list from a HubSpot workflow
The Add to Mailing List workflow action adds each enrolled contact or company to one of your thanks.io mailing lists, using the address on the HubSpot record. It does not mail anything and places no order. It charges your balance only when Email to Address lookup finds a missing address by the record's email; that lookup is on unless you set it to Off. The recipient lands on the list exactly as if you had added it from the sidebar card, and its address is sent for verification like any other recipient.
Use it to fill a list automatically from a workflow, then let thanks.io do the mailing: attach an automated campaign, such as a Days After Added campaign, to the list, and every record the workflow adds is mailed on the campaign's schedule.
Add the action to a workflow
- In HubSpot, go to Automation > Workflows and open a contact-based or company-based workflow, or create one.
- Click + where you want the record added and find the thanks.io app in the action panel.
- Pick Add to Mailing List.
- Choose a Mailing list (required).
- Leave the recipient fields blank to add the enrolled record with its own name and address, or map them to other properties (see Name and address fields).
- Email to Address lookup is on by default: a record missing its street address or postal code is looked up from its email, billed for each address found (see Email to Address lookup). Set it to Off to never be charged.
- Optionally map HubSpot properties to Custom field 1 through Custom field 10 (see Custom fields).
- Save the action and turn the workflow on.
If the action does not appear in the action panel, reconnect the app: open the install link under Getting started and authorize it again, so the connection grants the automation permission workflow actions need.
Mailing list
The Mailing list dropdown lists your thanks.io mailing lists, newest first, with each list's recipient count. Type in the dropdown to search by list name. It offers the same lists as the sidebar card: suppression lists and the lists thanks.io fills on its own (such as the QR scan list) are never offered.
A list created in the thanks.io dashboard, or from the sidebar card's + Create a new list... option, appears in the dropdown right away. The list is a fixed value for the step; every record that reaches it is added to the same list.
Name and address fields
The recipient fields are the same as on the send actions: Recipient name, Recipient first name, Recipient last name, Company, Address line 1, Address line 2, City, State / province, Postal code, Country, and Email. Each maps to a HubSpot property, and a field left blank is filled from the enrolled record's own property, so for most workflows you can leave them all blank. The name is put together the same way as on a send: a mapped Recipient name wins, otherwise it is first name plus last name, with either half you leave unmapped taken from the record. See the send action recipient fields for what each field falls back to.
Two differences from the send actions:
- Address line 1 and Postal code are required when Email to Address lookup is set to Off. With lookup off, every record added must end up with a street address and a postal code, either mapped or from the record itself.
- Email is stored with the recipient. It is used to find a mailing address unless Email to Address lookup is set to Off; the send actions' lookup, by contrast, cannot be turned off.
Names and addresses must be printable. A value with emoji or non-Latin characters fails that record's enrollment.
Email to Address lookup
Email to Address lookup decides what happens to a record that has no street address or no postal code:
- Look up address by email when it's missing (the default): thanks.io runs an Address Append on the record's email, the same paid lookup as the sidebar card's Look up address by email ($) button, and adds the record with the address it finds. A step that never touches the field behaves this way.
- Off: the record is not added and its enrollment fails. Nothing is ever charged.
With lookup on:
- It is billed per address found. Each lookup that finds an address is charged to your thanks.io balance at the rate on thanks.io/pricing. A workflow runs the step once per enrolled record, so enrolling a large list can add up. Test with a few records first.
- Only incomplete records are looked up. A record with its own street address and postal code is added as-is and never charged, whatever this setting says.
- A record already on the list is not looked up again. If the record was added to the same list before, from the workflow or the sidebar card, it keeps the address it has there, and nothing is charged. Re-enrolling a record never pays twice.
- The found address replaces the record's partial one. If the record has a city but no street, the whole address comes from the lookup, so parts of two addresses are never mixed. The record's own name, company, and custom fields are still used.
- If no address is found, nothing is charged and the enrollment fails.
- Your balance must not be negative. If it is, the lookup does not run and the enrollment fails.
- The record needs an email. A record with no full address and no email fails its enrollment. Company records usually have no email, so lookup rarely helps them.
The Address source output tells later steps which records were looked up (see Output fields).
Custom fields
Custom field 1 through Custom field 10 map a HubSpot property onto the recipient's custom fields 1-10. Those values are then available as replacement variables (%CUSTOM1% through %CUSTOM10%) in any mailer you later send to the list, including a campaign's. For example, map an agent-name or product property to Custom field 1 and write %CUSTOM1% in the campaign's message template.
- A custom field left unmapped, or mapped to a property that is empty on the record, keeps whatever value the recipient already has. The action never erases a stored custom field.
- Custom field 1 set to exactly
absenteeis special in thanks.io: it makes Custom field 2 the address the piece is mailed to. Don't map a property to Custom field 1 that might hold that value unless you intend it, and when you do, map the mailing address to Custom field 2.
What happens when the step runs
-
Missing address, lookup off. A record with no street address or no postal code is not added, and its enrollment fails. HubSpot's enrollment history shows the reason:
- "The enrolled record has no street address. Map a property to the Street Address field, fill in the record, or change Email to Address lookup from Off."
- "The enrolled record has no postal code. Map a property to the Postal Code field, fill in the record, or change Email to Address lookup from Off."
The "Street Address field" in that message is the step's Address line 1 field, and the "Postal Code field" is Postal code. Fill in the record, map a property, or change Email to Address lookup from Off, then re-enroll it.
-
Missing address, lookup on. The enrollment fails with one of these reasons, and nothing is charged:
- "The enrolled record has no full address and no email to look one up by. Map a property to the Email field, or fill in the record."
- "No mailing address was found for email. Nothing was charged."
- "The address lookup needs credits, and the thanks.io account balance is negative."
-
Enrolling the same record again updates its existing recipient on that list in place instead of adding a duplicate. Change the address on the HubSpot record, re-enroll it, and the recipient's address is updated and re-verified.
-
Card and workflow are the same recipient. A record added to a list from the sidebar card and then added to the same list by the workflow (or the other way around) stays one recipient, and the card shows the record as a member of the list.
-
Someone already on the list. If the list already holds a recipient with the same name and address that was added some other way, such as a CSV upload, that recipient is matched rather than duplicated. Only the values the HubSpot record actually has are filled in; a blank on the record does not erase what the recipient already had.
-
If HubSpot delivers the same execution twice, the record is still added only once.
Output fields
The action makes four values available to later steps in the workflow, for example to branch on whether the record was new to the list:
| Output | Value |
|---|---|
| Result (added, updated or already on list) | added when the record was added to the list as a new recipient, updated when this record was already on the list and its recipient was updated, or already_on_list when an existing recipient with the same name and address was matched. |
| thanks.io mailing list ID | The ID of the list the record was added to. |
| thanks.io recipient ID | The ID of the recipient on that list. |
| Address source (record, existing or email_lookup) | Where the recipient's address came from: record when it was on the HubSpot record or mapped on the step, existing when Email to Address lookup was not Off and the address already stored on the list was kept (not charged), or email_lookup when it was found by email (charged). |